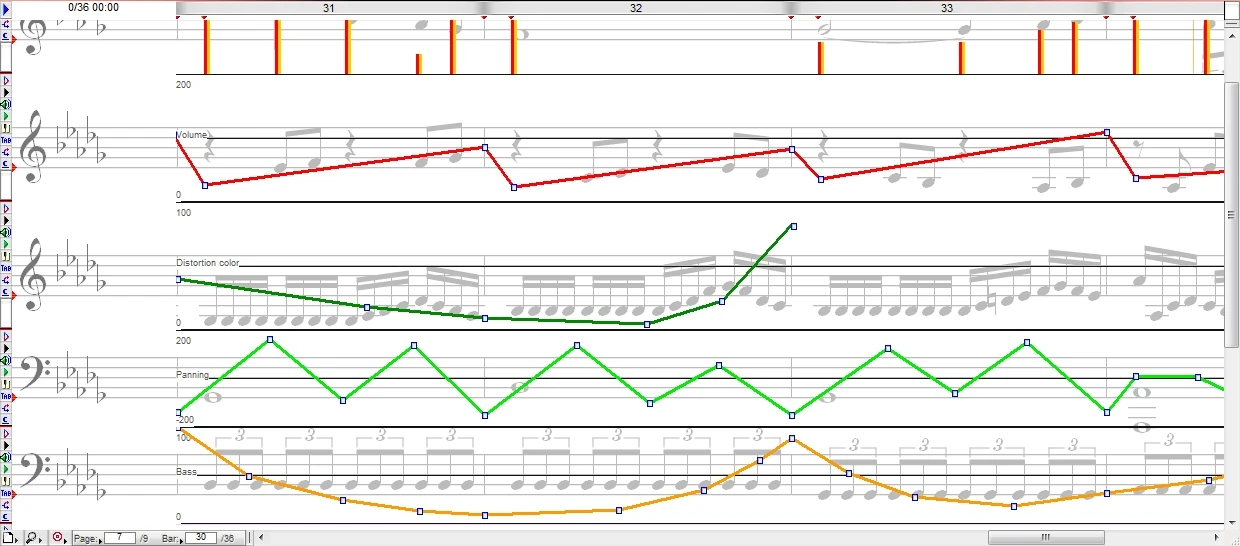
Some staves in parameter curve editing mode
In Harmony Assistant, a parameter curve is a graph associated with a staff, which allows the visual representation and editing of certain parameters related to that staff. Parameter curves are available from the staff menu of any type of staff (except for the text staff), by pressing the ![]() icon and selecting a curve type from the curve menu that appears. Shift+click on a curve from the list to make all staves in the score turn into the parameter curve's edit mode. To get back into normal staff editing mode, select "None" (first item) from the curve type list (shift+clicking the None curve also resets all staves to normal mode).
icon and selecting a curve type from the curve menu that appears. Shift+click on a curve from the list to make all staves in the score turn into the parameter curve's edit mode. To get back into normal staff editing mode, select "None" (first item) from the curve type list (shift+clicking the None curve also resets all staves to normal mode).
Editing the curves[]
Most of the parameter curve types are similar in editing. This excludes velocities and delay and pressure time, who have their own editing system. When a curve type is selected, the staff becomes disabled for other uses than curve editing, and the curve name is displayed in a label at the left of the staff.
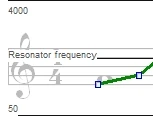
Part of a staff while being edited in resonator frequency mode
At the high and low boundaries of the staff area the maximum and minimum values for the current parameter curve are displayed.
To create a curve, first click with the mouse button anywhere on the staff. Note that while holding the mouse button, a yellow label with a number appears. Moving the mouse up and down changes this number, which represents the value of the active parameter. As an example, when editing a panning curve, placing the point at -200 (the lowest position) will make the staff pan at maximum left, while placing the point at +200 (as high as possible) will pan maximum right. When releasing the mouse button, a new point is created in the curve. Moving the mouse somewhere else on the staff and clicking again will add another point, which will form a line with the first point. This line is a smooth transition between the first and the last points' values. You can add as many points as desired, on the left, right and middle of the newly created parameter curve, as it will extend itself without limit.
Moving points is done by clicking and dragging the wanted point with the mouse when the cursor changes into a move cursor (the value label will still be shown). To move more points vertically at the same time, select a range of points (the alt selection works in parameter curve edit mode too) and move one of the points. Shift-click and drag on one point to move all the following points in the parameter curve.
It is also possible to delete a point or a line. Use Ctrl+click on a point to delete it, and the curve will "regenerate" by merging the two surrounding points. If however you want to delete a line, Ctrl+click on it. The remaining blank area will automatically have the default value of the curve (usually the center value). To merge two broken curves, delete the last point of the first curve.
Note that whenever a curve contains data, in the curve selection menu a green dot is added at the left of the specific curve, so it could be easier to track which curves are in use. If the curve is inactive, the dot turns red. For details about enabling or disabling curves, see parameter setup.
Relation with effects processors[]
Many of the parameter curves are closely related to effects processors, as they are both used to add acoustical modifiers to the data that is present on a staff. The advantage of curves is that while effects processors are rather static, occasionally offering a LFO option, parameter curves give full visual control over the flow of effect parameters, which includes smooth transitions much harder to control with individual effects processors. However, effects processors offer a wider option palette. For a full power, the two methods can be combined.
As curves can be placed on a same staff as effects processors, and their affected parameters coincide, the effect parameters of an effects processor are overwritten by curves. As processors can hold parameters which are unavailable to curves, these parameters remain as set by the processor. For example, if an effects processor is placed at the beginning of a staff, specifying a feedback delay with a time of 130ms, and a power of 80%, and a reverb power parameter curve starts from bar 6, bars 1 to 5 will play normally with the feedback delay, and starting from bar 6, the effect power will be set to whatever the parameter curve specifies, leaving the time to 130ms and the effect type to feedback delay. If another effects processor holding a feedback delay with 180ms and 20% power is active on the same staff, while the reverb power curve is still running. only the effect time will change from 130ms to 180ms. If a curve segment misses or the curve ends, the effect parameter remains at its last value set by the curve, unless a new processor is met. When there is no effects processor on the staff, other effect values then the ones given by the curve take their default state. Note that if the effect power set by a processor is 0, all parameters will be reset.
Relation with mixers[]
The complete mixer also has the possibility to set and edit data associated with effect modifiers. With curves, the transitions between effect value peaks are generally linear, but the mixer allows manually "drawing the curve" while the music plays. The mixer and the curves are interdependent.
Curve types[]
Currently, there are 18 types of curves:
- Velocities
- Delay and pressure time
- Volume
- Panning
- Frequency
- Flanger/chorus power
- Reverb power
- Resonator resonance
- Resonator frequency
- Distortion power
- Distortion color
- Treble
- Bass
- MIDI-specific a
- MIDI-specific b
- MIDI-specific c
- MIDI-specific d
- MIDI-specific e
Velocities[]

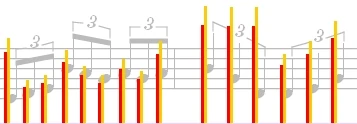
A few notes with velocities
The velocity is a property of any note in a score. The term is usually used in describing the MIDI property of a note, specifically how hard a key is struck on a MIDI keyboard. The concept of velocity is closely related to volume, but velocity can also affect a note's timbre. Velocities are different from other types of curves in that they are not displayed as a line chart like most parameter curves, but rather as something similar to a histogram, where each bar is associated to a note. Velocities are edited by dragging the bars with the cursor ("drawing" the histogram is also feasible).
Note that there are two velocity bars, one red and one orange. The red one specifies the note's own velocity values, while the orange one shows the velocity value after affected by dynamics.
Delay and pressure time[]

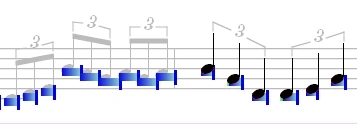
Same notes, but with delay and pressure times
The delay and the pressure time are other properties of notes. As the name points out, they specify how delayed the note playing should be, and how much time it should be held.
Volume[]


The notes having a volume parameter curve
Volume is the first parameter curve which can be edited according to the instructions given above. The volume curve obviously affects the volume of the notes played. Unlike the velocity, this does not affect the notes' timbre, and can act like an envelope for a note (a volume change has an audible consequence while a note is being played; a crescendo does not allow that). Still, volume can be used in combination to velocity to get some specific results. A volume of 0 means mute, and a volume of 200 amplifies the normal signal twice. Default value is 100.
Panning[]
The panning is the distribution in stereo space. This parameter curve can be used to create surround effects. A value of -200 means left channel only, while 200 means right channel only. Default value is 0.
Frequency[]
The frequency parameter curve affects the pitch of the current sample. Note that along with the frequency (pitch) of a note, its wavelength also changes, so notes who do not have a loop will be of a different duration, when the frequency change applies. This is why this parameter curve type is unavailable for digital tracks. The frequency value is represented by semitone cents, and ranges from -2400 (down 2 octaves) to 2400 (up 2 octaves). Default value is 0.
Flanger/chorus power[]
This and the next effects are closely related to options available in an effects processor. The value of flanger/chorus ranges from 0 (effect off) to 100 (full effect). Default value is 0.
Reverb power[]
A reverberation effect can be added to the staff with this curve. This reverberation is entirely similar to the effect which can be added with an effects processor, and the curve value affects the power parameter of this effect. The reverb duration, if there is no previous effects processor present on that staff, is the default value of 3000 milliseconds. The reverb power can vary from 0 (no reverb, default value) to 100.
Resonator[]
In a resonance effect, the most prominent parameters are the resonance and the frequency, being controlled with the resonance curve and the frequency curve respectively. Using the resonator curves can be a better alternative to the LFO resonator variant available in the effects processor, because of flexibility reasons. As most of the effect-related parameter curves, the resonator resonance has values between 0 (no resonance, default) and 100, while the resonator frequency ranges from 50 to 4000 (Hz), with 1000 being default.
Distortion[]
A distortion effect can be reached by using the distortion parameter curves, namely distortion power and distortion color. Distortion power controls the amount of distortion, and distortion color controls the distortion tone, also acoustically affecting the amplitude level. Both range from 0 to 100, 0 being default for power and 50 being default for color.
Equalizer[]
An equalizer system is present in two parameter curves, who specify a treble and a bass value between 0 (default for both) and 100.
MIDI-specific a-e[]
Midi-specific actions have no audible effect if the staff they're associated with has a digital output. They are dedicated to MIDI outputs, as they send user-defined parameters to MIDI devices. Such parameters can be set in the parameter setup window.
Parameter setup[]


The parameter curve setup dialog
Each parameter curve type has a number of options associated with it. From the curve menu, select "Setup..." to bring the curve setup window.
At the top of the dialog, there is a list containing all available parameter curves except for the special ones ("Velocities" and "Delay and pressure time"). Selecting a curve from the list will change the window elements respective to that curve. All curves have activation, range and color, and there also is an option to apply the current settings for the selected curve to all staves in the score. MIDI-specific curves also have a text field in which the user can specify what the MIDI curve does.
Activation is an easy concept: a curve only affects the staff output when enabled. This can be particularly useful when doing tests and experimenting, as entirely removing the curve might be inconvenient. As mentioned earlier, a curve that contains data displays in the curve menu a green dot if enabled and a red one if disabled.
The range parameters are extremely useful if a more accurate approach is needed. For example, the default frequency range is -2400 to 2400, meaning that from the lowest value to the highest one there is a difference consisting of four octaves. Such a large interval could render precise frequency adjustments difficult, so one can set the frequency curve to have a smaller impact, like a semitone up and down (-100 to 100). The range setting is unchangeable at any point inside the staff; it remains global from the first to the last bar.
The color option is purely visual, and selects what is the color in which the selected curve should be displayed.
Defining MIDI-specific parameters[]
Direct quote from the Harmony Assistant manual:
|
Command input is made in hexadecimal (base-16 digits, each digit being a value between 0..9 or a letter A..F). The value read on the curve will be used to replace sequences of the characters 'm' and 'l' in your command line: 'l' is replaced by the least significant bits (LSB) of the curve value, and 'm' is replaced by the most significant bits (MSB), as explained in the table below. The 'n' character will be replaced by the MIDI channel number. All other characters, such as spaces or commas, are ignored and can be used as separators.
|
Applying textures[]
Press "Apply..." in the curve menu to bring the Fill curve dialog. This is an automated way of editing a parameter curve. The following methods are available:
- Filling a curve with a given constant value
- Filling a curve with a triangular or squared wave (useful to create LFO effects) of a given amplitude and frequency, with the possibility to start from the high point or the low point by checking "Inverse"
- Multiplying the current values present on the curve with a given percent
- Adding a random value from -n to n where n is the given parameter, value which applies to all current curve points.
Evidently, all values that exceed boundaries are clipped.
If nothing is selected, the action applies to all the staff. Otherwise, only the selection is affected.
Other commands[]
"Erase the current curve" clears all the content of the current curve. This should be used instead of selecting the staff and pressing Delete, as the later method also deletes effects processors.
"Activate all curves" and "Deactivate all curves" enables or disables all the curves that contain data associated to the staff.